How's this for a Shower Curtain!
Amy wanted a change for her kid's bathroom.
She said she wanted something fun with lots
of color and pattern.
So began my fabric hunt for the fun, funky and fabulous!
Because the bathroom is shared by both her son
and daughter, Amy wanted to keep the design
comfortable for both. Not too girly! Not too boyish!
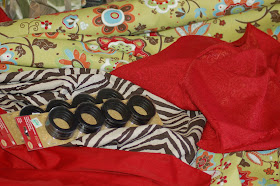
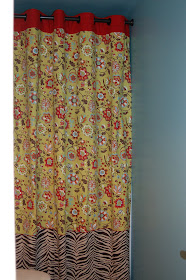
We chose the funky floral with the apple
green background as our main fabric.
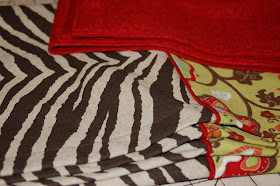
Then added the brown zebra as an accent.
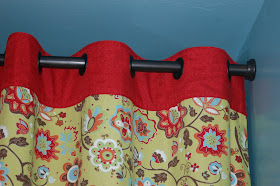
If you look closely you can see the last fabric
(shown on the right) is a red tone-on-tone fabric.
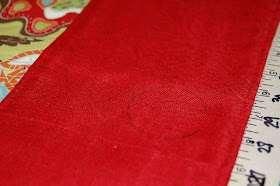
Because this fabric was being used at the
top of the curtain, where we attached the
grommets, I layered it with a solid
red for extra strength.
I then added a small piping between the two main
fabrics as an extra detail.
Now, on to the Grommets!
If you've never used grommets they can be
more than a little intimidating!
At this point you're thinking...
"I have this beautiful shower
curtain and I have to go and CUT HOLES in it!"
YIKES!
But, if you go slow,
measure...and then measure again,
It can be done and you'll love the results!
ALWAYS use an even number of grommets.
The finished width of this shower curtain
was 88" with 12 grommets.
Allow 4" or more at the top of your
shower curtain to accommodate
the grommets. My header was 6" high.
With a pin, mark center position for each grommet.
First I determined how far in on each side I wanted
my first grommet. I placed the center of the grommet
3" in on the left and 3" in on the right.
Measure the distance between these and divide.
Since I was using 12 grommets, having already
placed 2, I needed to place 10 more.
So I divided by 11 (number of spaces).
For example: 88" wide curtain
-6" left and right grommet
=82" divided by 11 spaces
=7.45"
So the remaining 10 grommets were approximately
7.5" apart center to center.
I then placed the center of the grommets
2" from the top of the curtain.
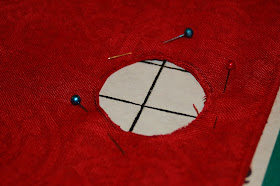
Using the template provided in the grommet package,
I marked the placement of each grommet.
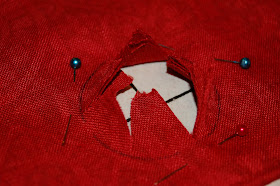
Because I had 4 layers of fabric, I pinned first to
secure the layers and then carefully cut out the circle.
Now, at this point I should have a nice picture
showing you how I put the grommets together!
OOPS!
Forgot to take one!
The grommets come in pairs that snap together.
One piece for the front and one for the back.
You just snap them together over the hole!
Very easy!
(The grommets I used came from Hobby Lobby
and include instructions!)
(The grommets I used came from Hobby Lobby
and include instructions!)
TA-DAAAA!!!
Not only is this absolutely adorable as a shower
curtain but could easily be adapted for
a window treatment!
I used a 1 5/8" unfinished wooden dowel rod with
wooden closet brackets that I stained and painted
to get the rich black/brown color we wanted.
We chose Sherwin Williams "ebb tide" for wall color.
Amy says everyone who walks into the bathroom
just loves the new look!
SO DO I!!!
Have a Blessed Day!
linking to:

That is so cute, and I LOVE that wall color...my favorite!
ReplyDeleteI love it! The mix of fabrics is wonderful and it is gorgeous with the blue!
ReplyDeleteEnjoy!
Cathy
When I decide to change my bathroom, I will definitely be tempted to make my own shower curtain now!
ReplyDeleteI love the mix of fabrics!!!! You are going to laugh at me when I say this but when my kids grow up, I'm taking a sewing class!!!!
ReplyDeleteWhat a great and funky shower curtain. Love it. Thanks so much for coming by.
ReplyDeleteI love the shower curtain. Your blog has become my favorite! I love your style. Can you tell me the name of the apple green fabric you used? I've been looking for a fabric with reds, brown and blues for my living room.
ReplyDeleteAmaaaaazing! I would never have known to put those fabrics together, but it looks great!
ReplyDeleteElizabeth
www.justfollowingjesus.com
Stacey,
ReplyDeleteI'm so glad you're enjoying the blog! That's what this is all about! Everyone has been so supportive! Thank you!
The floral fabric is called "whimsey fern". I bought it locally but it can be found online at 1502Fabrics.com.
LOOOOOVE IT!!! I think the fabrics you used are so great together! Saving this along with many others from your blog to my idea file.
ReplyDeleteI just wanted to stop by and let you know that I linked to this post today from the new Home & Garden channel at Craft Gossip. :) My hope is to share many of the fabulous projects I see everyday with the vast CG audience. I hope you will not only stop by and subscribe to CG, but will tell your friends about the new category! Hope you see some traffic from it!
ReplyDeleteYour feature will appear in the main Craft Gossip RSS feed, on the main home page and can be found directly here
http://homeandgarden.craftgossip.com/make-a-cute-shower-curtain/
If you would like a "featured by" button, you can grab one here!
http://homeandgarden.craftgossip.com/grab-a-craft-gossip-button/
Cute shower curtain...I love the floral fabric!
ReplyDeleteAnother fantastic job, Sonya. I always love your combination of fabrics. Thanks for linking with FFT :).
ReplyDeleteThis turned out great! So glad to hear they come with instructions though because for something so visual, I'm sure I'd mess it up. I don't have any treatments with grommets at the moment, but I like the ease and casualness of them. They seem perfect for a shower curtain application, too!
ReplyDeleteI LOVE IT!!! It looks great!!!
ReplyDeleteI'm a new follower! :)
Great Job! I love the new look!
ReplyDeleteNow that is a totally different shower curtain. and I love it! I'm one to make my own curtains for the bathroom also...
ReplyDeleteNice..
sandy
thewondersofdoing@blogspot.com
I LOVE the choice of fabrics and the grommets look much cuter than plastic shower curtain rings!
ReplyDeletethis is beautiful!! the fabric is great together!!
ReplyDeleteI just saw this at Tater Tots and Jello, this is so cute! I love the color combinations. Great job.
ReplyDeleteLove the mix of fabrics. I need to try grommets some time.
ReplyDeleteWarmly, Michelle
Fabulous! You made grommets look doable- they've always scared me before. Thank you!
ReplyDelete