
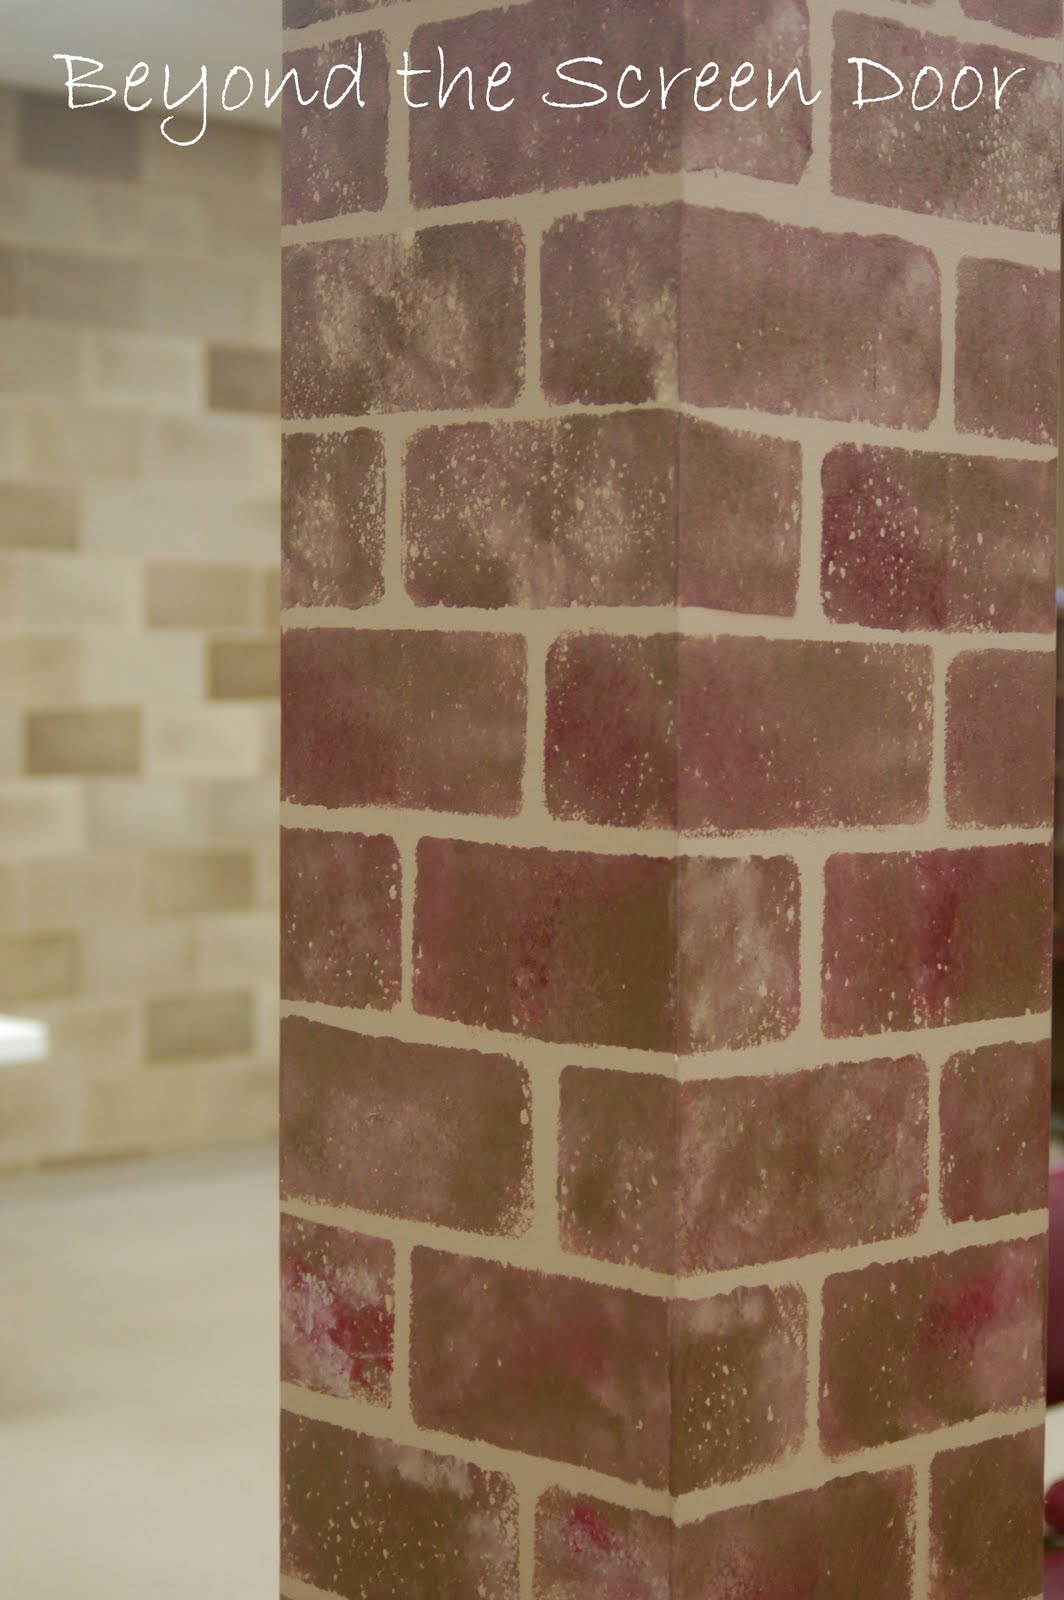
Part 2 of the paint treatment in The Grapevine at Trinity Worship Center involved painting two support columns with a brick pattern. See The Grapevine: Part 1 for details on painting the stone wall.

Before

The bricks were created by combining variations of two red paint colors plus the three darker colors used to create the stone. The reds for this project were chosen with the color of the chairs used in The Grapevine in mind. They are a deep burgundy/wine color.
When deciding the size of the bricks, I took a bit of creative license. I'm not sure if ALL bricks are the same size but the one's used on the exterior of the church are 2.5" x 7.5". The columns were 9.5" square. I decided to make my bricks 3" x 6.25". Again, no formula just what I thought would visually look right for that size column.
I began by cutting a basic kitchen sponge to the size I wanted.


To make the brick, press the painted sponge firmly onto the wall.

This is NOT what you want it to look like!


i.e...wonky grout line!

I choose to use the dark brown as the predominant color with the bricks. But there is plenty of the burgundy red color to allow the bricks to blend with the burgundy chairs and tablecloths used in this space. These two columns took approximately 4 hours to paint.

An additional step you could do when painting brick or stone is to lightly paint a "shadow" along each brick. Imagine where your "light source" is coming from and paint a gray shadow along the bottom and one side of your bricks or stone.
Stay tuned for Part 3 which will show a striped awning for the serving window as well as simple window treatments for two opposing windows.
I love the warmth brick brings to a space. As is clearly evident by the brick walls in our dining room!


SHARING WITH:


Sonya I love the look of brick in a home! Your brick work is awesome!
ReplyDeleteIt looks great. You make it look easy.
ReplyDeleteThat last wall with the treatment really looks like a brick wall! When I saw your post I thought you were going to explain how to paint OVER bricks!! haha!
ReplyDeleteIt looks awesome. From the first pic I thought you used those thin faux bricks and actually bricked it. I can't wait to see the awnings.
ReplyDeleteWhat a great job!!
ReplyDeleteYou are talented!! It looks fantastic and thanks for the wonderful tutorial.
ReplyDeleteHey girl, nice job. I'm so glad you tied those chair colors in--they stand out a bit... I didn't realize the home you showed previously had painted brick, I'll go back and take another look. I'd really like to do something different in my home, but the dimensions are so large, I may have to wait till we downsize, sigh. Hugs, Kim
ReplyDeleteIt looks so real..Great job..Hard to believe it's just paint..
ReplyDeleteJanet
Your bricks look great! And I love your "paint tray"
ReplyDeleteTraci
Excellent! I have long wanted to add a brick wall in my kitchen. I have some stencils, but this seems easier. Thanks for sharing!
ReplyDeleteThanks for the sweet comment on my blog! I LOVE your brick ideas :) Your kitchen is AMAZING! I'm in complete LOVE!
ReplyDeleteWow, this is so awesome! I love how realistic, yet artsy, this technique looks. I'm going to be trying it. Thanks for sharing.
ReplyDeletePinned on pinterest. :)
Cheers,
Tracy Screaming Sardine